Difference between revisions of "Hex"
(→Overview) |
|||
| (One intermediate revision by the same user not shown) | |||
| Line 9: | Line 9: | ||
Hex is currently built for the CNTRL:R, but it's functionality can be accessed from any controller by using Live's MIDI Mapping capabilities. It will include support for other grid-based controllers that are compatible with Monomodular with future releases. The idea here is to eventually replace the functionality of Stepp:r, Polygome, TR256, and Binary with a single patch that is accessible from multiple controllers at once, while improving the speed, efficiency, and capabilities of the originals. | Hex is currently built for the CNTRL:R, but it's functionality can be accessed from any controller by using Live's MIDI Mapping capabilities. It will include support for other grid-based controllers that are compatible with Monomodular with future releases. The idea here is to eventually replace the functionality of Stepp:r, Polygome, TR256, and Binary with a single patch that is accessible from multiple controllers at once, while improving the speed, efficiency, and capabilities of the originals. | ||
| − | + | '''Video Demos''' | |
| − | [http://www.youtube.com/watch?v= | + | [http://www.youtube.com/watch?v=BkyNa4tz1y4 Hex Basics] |
| + | [http://www.youtube.com/watch?v=V6TOLEEDQfU Hex Details] | ||
=The User Interface= | =The User Interface= | ||
Latest revision as of 01:13, 6 December 2012
Contents
Overview
Hex contains sixteen sequences, or parts, that can be edited and manipulated in real time in various ways from the controller. When linked to a properly configured DrumRack, the controller's encoders control parameters belonging to each of it's chains. When in PolyMode, the part can be transmitted directly to an instrument and send a pitched sequence. Each of the sequences contains sixteen different presets, which can be chosen and stored directly from the controller. Loop begin and end points can also be set using the controller. All of the sequences speed settings can be set changed independently in either quantized or unquantized amounts. Sequence timing can be synchronized between different parts in an easy fashion. Different behavior definitions can be made for each step of each sequence directly from the controller. Part-mute and preset changes can be recorded directly into the currently playing MIDI clip on the same track that the mod is present, even while playing back previously recorded automation data in the same clip.
Hex combines most of the ergonomics of the Livid Stepp:r with the versatility and speed of the "binary" mod I wrote for the Code last year. It is still a work in progress, and some features are still being fleshed out (among which are polyphonic step mode, solo mode, and trigger mode). While borrowing heavily from both of its predecessors, it yet promises a lot of unrealized potential under the hood. A great deal of the underpinnings of "binary" have yet to be implemented.
Hex is currently built for the CNTRL:R, but it's functionality can be accessed from any controller by using Live's MIDI Mapping capabilities. It will include support for other grid-based controllers that are compatible with Monomodular with future releases. The idea here is to eventually replace the functionality of Stepp:r, Polygome, TR256, and Binary with a single patch that is accessible from multiple controllers at once, while improving the speed, efficiency, and capabilities of the originals.
Video Demos
The User Interface
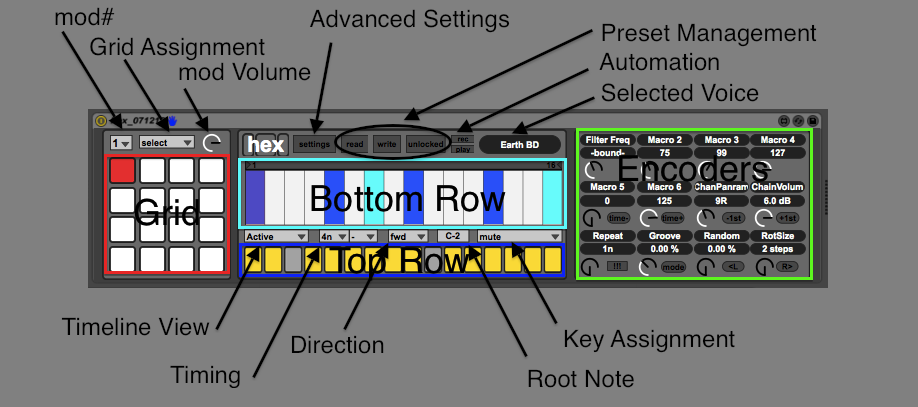
The currently selected sequence data is displayed in the center pane. To change what data is being viewed, select a new new view mode. The default view shows the active state of each step in the currently selected sequence. Active state can be changed via the controller, but other types of data can currently only be changed from the UI (duration, velocity, rulebends, pitch). This will change when Ohm/Block integration is finished (but probably won't matter to you unless you own a CNTRL:R and another grid-based controller).
Three main areas of control are delineated in the patch UI, and are controllable in different ways with their corresponding controls on the CNTRL:R.
The Grid - this describes the 4x4 RGB buttons in the center of the CNTRL:R.
The Keys - this describes the 16x2 RGB buttons on the bottom of the CNTRL:R. They are broken into two sections, the Top Row and the Bottom Row.
The Encoders - this describes the top endless rotary encoders and their corresponding buttons.
Each area can be assigned different functionality based on the two assignment menus on the UI. You can select a way to work from the UI itself, or you can use the "Mode" button on the bottom row of encoders to step through the available modes.
The Grid
select
In its default position, the grid is in "select" mode. Each of the buttons corresponds to a sequence. You can select which sequence you are currently editing by pressing one of the sixteen buttons. The UI and the CTNRL:R will automatically update to reflect the data contained in your selection. If an appropriate instrument is configured, the encoders will control and reflect the current value of its parameters.
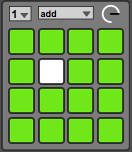
add
In "add" mode, pressing one of the grid buttons will add a note event to its corresponding sequence at its current time position. It will also play the note if the transport is running. It will always select the new sequence.
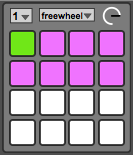
freewheel
This mode is currently broken for the sake of getting the release out, but will be back soon!
In "freewheel" mode, the grid operates in the same manner as "select" mode. However, the encoders rings reflect the current position and data for each of the grids highlighted 8 sequences, and the encoders themselves control the unquantized speed of each of the sequences.
The green LED of each encoder ring indicates whether or not a sequence is currently quantized.
A quantized sequence will become unquantized if it's corresponding speed dial is turned, or if it is synced to another unquantized sequence (see "wheel syncing").
An unquantized sequence can become quantized if it is selected and one of the speed buttons are pressed. It will lock to the nearest quantization value, depending on which direction you've nudged it. It can also become quantized if it is synced to another quantized sequence (see "wheel syncing").
The encoder's will automatically be updated to reflect the currently selected sequences region any time the sequence you've chosen is outside the bounds of the last one you'd selected. The encoder's assignments will always be reflected by the highlighted (magenta) area of the Grid.
mute, preset, global
The "mute", "preset", and "global" modes correspond to the key modes of the same name. They are provided for convenience when creating sequences and editing. They are NOT available via "quick-select".
quick-select
Quick-select allows an alternate method of stepping through different modes and functionalities in the patch. Any time you hold down a Grid button while selecting a part, several things change:
1) An alternate assignment of the upper keys appears, and will remain until the button is released. The default mode entered in quick-select is "single preset", but it can be changed in the settings menu to any of the available key modes.
2) Pressing the mode button (one of the encoder buttons) will step through the available Grid modes instead of the key modes. Caveat: pressing the mode button while in "add" mode will ALWAYS cause the Grid to return to "select" mode.
3) Pressing the button corresponding to another part will synchronize the timing of that part to the current timing of the chosen sequence (see "wheel syncing").
4) Alternate encoder-button functionality is available:
---Speed buttons change notetype, ---Repeat button steps through direction. ---Rotate buttons change the active sequence view.
The Keys
Lower Keys
The lower keys always represent whether or not a current step is active. The active state of a step can be toggled off/on with its corresponding button.
Upper Keys
mute
In it's default mode, the upper keys control the mute state of each part. Mute data can be recorded into a playing or recording clip (see "Automation").
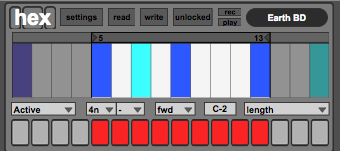
length
The length of a sequence can be changed on the fly by pressing one of the buttons corresponding to the position in the timeline where you wish the part loop. By holding down the loops end-point and selecting a button at an earlier position, you can also change the loops start point.
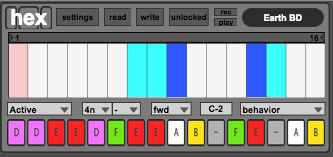
behavior
The behavior assigned to each step can be changed. Any current assignments are also reflected for the selected sequence. See "Behaviors", below.
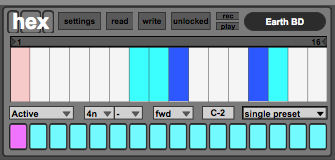
single preset
The currently selected part's preset can be chosen by pressing one of the buttons. Each time you change to a new preset, the currently selected preset is stored (however, this behavior is defeated when the "Lock" feature is enabled. This can speed things up considerably, see the section about "Lock").
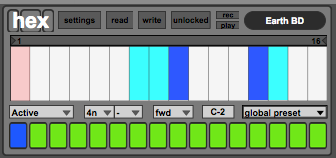
global preset
In global mode, selecting a preset recalls the corresponding preset for EVERY part. It's important to understand that (currently) when changing global presets, only the currently selected part's preset data is stored. (I've tried it the other way, it's just too darned slow)
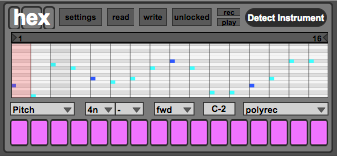
poly record
Poly record mode allows the user to record a sequence of notes via the keys top keys. The notes will only be played back at their recorded pitch if the selected voice is set to a channel other than "Plug". Unfortunately, this limits use of this feature to OSX only....however, I have a solution for Windows user's coming soon ;)
poly play
Poly play mode allows the user to play back the current sequence immediatedly, ala Polygome. Each of the top keys represent a base note, and pressing it will start the sequence playing independent of the current time position, with its root based on the note pressed, and locked to the current mode setting. It's also important to recognize that the Poly Offset parameter is useful here, since otherwise the sequence base note will be C-2.
The Encoders
Hex is capable of latching to the controls of multiple different instruments in your Live set. I've done my best to make it capable of being both a Drum-based beat programmer as well as a semi-capable, freewheeling note sequencer for use with other instruments. Because of this, things get a little tricky here.
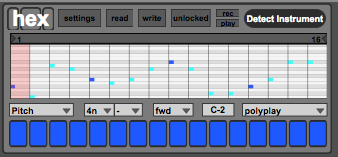
When you open hex for the first time, it should be in its default mode, or "Plug" mode. This means that its output is sent to the m4l plugins output. You can either place a DrumRack after it or send the tracks output to another track containing a DrumRack that you want hex to play. If hex does not automatically detect the DrumRack you wish it's encoders to control, it will look something like this:
Don't worry, all is not lost. Just press the button that says "Detect Instrument". A little window will be floated on your screen, that looks like this:
Select the DrumRack you wish to control (the "Blue Hand" should appear on it, and it should be hilighted), and then press the button in the float. The CNTRL:R's encoder rings should immediately update to reflect the currently selected part's parameters.
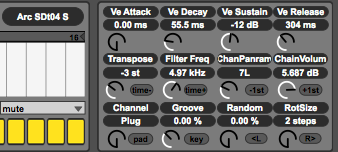
Your GUI should look something like this:
If you're not happy with the parameters that hex uses, just group the instrument and assign the macros to the parameters that you wish to control. Hex will happily lock to them instead.
When you're ready to go further and explore some new madness, turn the "Channel" encoder to something besides "Plug". In addition to the plugin's output, hex can transmit your part to one of sixteen MIDI channels. Hex stores a different device for each MIDI channel. In this way, you can quickly assign a single note sequence that is outputting to your DrumRack to an instrument in a completely different place in your set, and it will start playing whatever multi-note pattern you've recorded in that track.
You can change the channel that the part is assigned to by turning the channel encoder:
There are a few caveats here. As mentioned earlier, this only currently works on OSX. You'll need to create an IAC loop passthrough by doing the following:
1. Create an IAC Bus in OSX"s "Audio MIDI Setup".
2. Make sure the IAC Bus's port is set for "Track" (both input and output) in Live's MIDI Preferences.
2. Open hex's Settings and assign that IAC Bus as the "Poly Output Port".
3. Assign the instrument you want to control to Hex in the same manner you did with the DrumRack. You'll need to do this once for each of the sixteen channels, but the settings will be stored with your project unless you delete the controlled instrument at some point.
4. Set the MIDI input port of the destination instrument's track to the IAC Bus you've created, and set its Channel input to the channel you assigned the instrument to in hex.
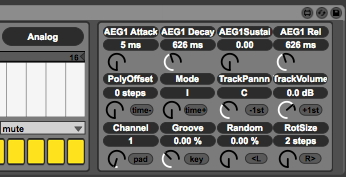
Once you have assigned an instrument to one of hex's individual channels, the display should look like this:
Notice that there are some differences. Hex only controls 4 parameters of the target instrument (on the top 4 encoders). On the second row of encoders, PolyOffset and Mode have replaced the "Plug"s parameter assignments.
PolyOffset is the base note of your sequence.
Mode is the scale mode which the sequence will use.
For perhaps a better explanation of how this works, see the video:
Other Controls
The modVolume dial controls the master output of the entire patch.
The "Mode" button steps through all available Key modes, making it easy to work in a different way.
Wheel Syncing
It is easy to synchronize the speed of two different parts. Select the part to which you want to synchronize, and while holding down its button, press the button corresponding to the sequence you wish to change.
Automation
Hex allows recording of automation directly to a clip that is playing or recording on the track it's on. To enable this, either create a MIDI clip on its track and start playing it, or start recording a new clip on its track. Then, press the REC button on its UI. Any "mute" or "single preset" changes that you make will be recorded in the clip as you make them.
In order to play back this data, just play the clip and make sure that PLAY is turned on in the UI. You can have both PLAY and REC enabled at the same time in order to overdub new changes (however, this will not currently erase older data).
Hex uses note-based automation. It's important to understand a little about this: any note event arriving at the mod's input can be interpreted as automation data. Hex reserves note numbers above 113 for use with automation. As long as "Play" is not enabled, nothing dire will happen. However, be sure not to send unintentional notes to Hex when it's in play mode, or some wacky things will probably happen. Any notes below its automation range will just be passed through to hex's output.
Behaviors
In order to create more variability in a sequence's sound, you can assign behaviors to each step of a sequence. This allows changing how a step acts over the space of 8 bars of 16 beats.
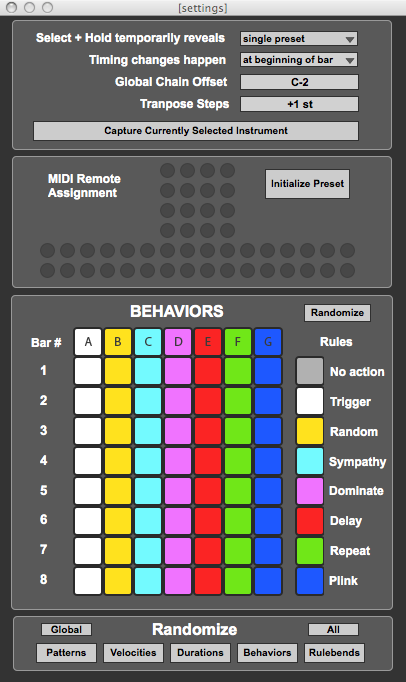
There are seven user definable behaviors. They can be assigned in the advanced settings. Each behavior has 8 steps. Each step corresponds to one cycle of a loops sequence.
By default, each behavior is filled with one type of action. This can be changed by clicking on the Behavior grid in the settings menu. The available actions are:
1) No Action. When no action is chosen, nothing will be played on the assigned cycle even if a step is active in the sequence the behavior is assigned to.
2) Trigger. When trigger is chosen, if a step is active on the assigned cycle, a note will be played in the sequence the behavior is assigned to.
3) Random. When random is chosen, the step may or may not trigger a note based on chance. In addition, the corresponding 'rulebend' for the step determines the how likely the note will trigger.
4) Sympathy. If another rulebend in the current step of any other sequence is equal to the currently selected sequence step's rulebend, the note will play.
5) Dominate. If active, the note will play. In addition, it will mute any other notes played by other sequences unless those sequences are also set to dominate. The length of dominance is determined by the corresponding step's rulebend value.
6) Delay. If active, the note will play, but a delay will occur before it is triggered corresponding to that steps rulebend value.
7) Repeat. If active, the note will play, and will be repeated. The interval and number of repeats is determined by the rulebend value.
8) Plink. This will start a particle in any Plinko mod that is currently in the set. The rulebend determines the direction of the particle. The particle will appear in the square corresponding to the part(x-coordinate) and the step(y-coordinate).
Advanced Settings
Select + Hold Temporarily Reveals:
Changing this setting allows cusomization of what mode Quick-view snaps to.
Timing Changes Happen:
If set to "immediately", quantized changes will happen when they are made. Otherwise, timing changes will not be triggered until the beginning of the part's next loop.
Global Chain Offset
This one's important. And a little tricky. All you need to know: set this value to the lowest note in your DrumRack, and don't allow any gaps in the your Rack. You can always insert an empty InstrumentRack in blank spaces, but there can't be any gaps or the parameter controls will not lock to the correct chain when you select a new sequence.
Because there is no way to determine the note-assignment of a DrumRack's chain, it is necessary to order your DrumRack with no gaps. It's not important which note it starts on, but if you start at a note higher than 0 (C-2), you'll need to compensate for chain detection by changing this setting.
Transpose Steps
You can change the number of steps that are changed when using the "-1st" and "+1st" encoder buttons by changing this value.
Capture Currently Selected Instrument"
If you wish to use Hex with an instrument or DrumRack that is not immediately adjacent to it, you can select the instrument you wish to control in Live and then press this button. Hex will detect the new instrument, and should store it's id for your concurrent sessions.
MIDI Remote Assignment
You can use Live's MIDI Learn functionality to assign any controller to the CNTRL:R's controls.
Initialize Preset
Clear the currently selected preset's data. This clears all sequences in the currently selected preset slot, not just the selected sequence.
In order to clear all presets in all sequences, make sure the "Global" button is active in the Randomize section below, then press the Initialize Preset button. It'll take a few seconds.
Behaviors
Assign new actions for each type of behavior by clicking the squares on the grid. Each step will cycle through all available actions.
You can use the Randomize button in the top right corner to shake things up a bit.
Randomize
Randomize individual data types for the current global preset. You can randomize all data types in the current preset by pressing the "All" button.
If "Global" is active, any randomization or initialization changes will affect all global presets (that means every single preset in every single sequence). Be carefull....it takes a little while.
Known Issues and Bugs
Read and Write (via pattrstorage) are currently broken. I'm looking into this.
Freewheel is currently not functioning correctly. This was working in the prototypes (as it works in "binary", as well), but due to some last minute bugs that cropped up I had to disable some of this mode's functionality in order to promote better timing for the rest of the patch. It will be back to normal in an update, hopefully soon.
In addition, freewheel encoder rings are not getting updated properly when changing presets or initializing the patch. You will have to manually select a part before its encoder ring display correctly updates.
In Freewheel mode, the bottom encoder rings do not currently light to display the value being controlled.
Automation rec/play currently only supports the mutes and single preset changes. This will probably see more additions later if it proves to be truly useful.
Technology
Here are the header comments from the core js file, which might give a little more food for your curiousity:
This script is the result of collaboration with Peter Nyboer @ Livid Instruments and represents a great deal of effort to gain some speed and stability from the original Steppr without sacrificing too much readability. The majority of the functionality for the entire patch can be modified in this js or the accompanying poly~ object, "steppr_wheel", without ever opening the actual containing patch in the m4l editor (this is crucial for speeding up the development process). Because of this, the functionality of the patch can be radically altered merely by modifying the poly~ or adding some lines of code in to this js. As an example, the poly~ used as the base for this patch is only a slightly modified version of the "binary" mod (from Monomodular), and the majority of processes in this script are maintained between both versions.
Although the original ideas came from the Stepp:rs, this patch is in fact a complete recoding of those ideas.
More to come shortly....

