Difference between revisions of "How Mod Works"
(→Input and Output Settings) |
|||
| (25 intermediate revisions by 3 users not shown) | |||
| Line 1: | Line 1: | ||
| − | + | Mod is the hub of all communcations between [[Mods]] and their Mod capable controllers. Each client control script works in a unique way, but most of them share some standard features when it comes to manipulating the m4l patches they are designed to interact with. | |
| − | + | Mod controllers all have the capability of controlling a Monome256 workspace. Each one does it in its specific way. The only necessity required to integrate a controller with the Mod design is that it has an 8x8 grid of buttons. Other functionality is present on some controllers, but the main features of Mod are encapsulated below. | |
| + | == mod Selection == | ||
| + | Mod controller's automatically detect the currently selected device in Live's GUI. If the device is a mod and the control surface is in the appropriate mode, it will hand over its controls to the mod. | ||
| − | == | + | == The Grid == |
| + | Since each supported controller has a different layout, the grid and its assignments will vary between different mods depending on the controller that you're using to access it. | ||
| − | + | Mod provides a way to access a 256 cells (16x16) grid even even when the controller itself has a smaller workspace. Although some mods use a smaller, fixed workspace, others (specifically mods which are ported from monome applications) utilize the full grid of 256 cells and only display a portion of the workspace at any given time. It is possible to navigate the currently viewed portion of the grid on within these mods by using the modNav buttons, or pressing shift and using the grid buttons to select the currently viewed portion of the grid. | |
| + | Mods that emulate monome256 workspaces use what is called "Legacy Mode", and provide some basic controls that are fairly universal between all the "Legacy Mode" mods. Some of the controls (such as modNav, modChannel, and some common modKeys) will be available in all "Legacy Mode" mods. | ||
| − | + | If you are not familiar with how a monome works, you might want to check this out: | |
| + | http://en.wikipedia.org/wiki/Monome | ||
| − | + | and this: | |
| − | + | http://monome.org/ | |
| − | |||
| − | + | == The modShift Button == | |
| − | + | The modShift button generally does the following: | |
| + | The modShift button, while pressed or locked, allows navigation to the selected viewing area of the 256Grid on mods that support a full grid. When active, the grid will light to indicate which area is currently selected (either by colors or by different flashing states). | ||
| − | + | On most controllers, while holding down modShift and pressing one buttons on the top row of the grid allows the user to select a new device in Live via the [[Device Selector]]. | |
| + | For "Legacy Mode" mods, holding down modShift and pressing one of the buttons on the second row from the top of the grid allows the user to change the MIDI output channel on mods that support multi-channel MIDI transmission. | ||
| − | + | It causes the bottom row of buttons to change over to 'modKey Mode', and their status to be updated accordingly. The modKey buttons are patch specific in functionality, but there are general conventions about how they are used in most of the mods. Most of the time the left four will indicate and change the mod's 'mode', and the second four control timing of the mod if it is slaved to its internal clock. | |
| + | [[File:8x8_shift.png]] | ||
| − | |||
| + | == The modAlt Button == | ||
| − | + | By pressing the dedicated "modAlt" button on the controller, it is possible to access additional functionality from the "modKey" buttons as well as mod specific functionality (see the description of each mod for information on how this works for the specific implementation). | |
| − | |||
| − | + | == mod Timing == | |
| − | |||
| − | == | ||
Most of the Mods have their own internal timing engine that is sync'ed to Live's clock. This, however, may be disengaged in order to trigger the timing process of the plugin from an external source (see below). | Most of the Mods have their own internal timing engine that is sync'ed to Live's clock. This, however, may be disengaged in order to trigger the timing process of the plugin from an external source (see below). | ||
| Line 46: | Line 50: | ||
For most of the Mods, timing can be controlled by the last four Keys. The first of these changes the timing to Quarter note divisions, the second to Eighth note divisions, and the third to Sixteenth note divisions. The last button toggles Triplet timing. | For most of the Mods, timing can be controlled by the last four Keys. The first of these changes the timing to Quarter note divisions, the second to Eighth note divisions, and the third to Sixteenth note divisions. The last button toggles Triplet timing. | ||
| − | In addition to the | + | [[File:Grid timing.png]] |
| + | |||
| + | In addition to the modKey controls, most Mods also have a 'Timing Multiplier', which speeds the timing engine up by the chosen amount. | ||
| − | == | + | == Input and Output Settings == |
Each Mod has its own idea of how to get things in and out. For most, however, there is a fairly standard MIDI settings dialog which allows the user to change how things are routed. | Each Mod has its own idea of how to get things in and out. For most, however, there is a fairly standard MIDI settings dialog which allows the user to change how things are routed. | ||
To change these settings, press the 'MIDI' button. This will bring up a floating window with that Mod's MIDI settings. | To change these settings, press the 'MIDI' button. This will bring up a floating window with that Mod's MIDI settings. | ||
| + | |||
| + | [[File:Mod midi settings.png]] | ||
By default, a Mod will transmit its output to the TrackOutput of its plugin. That means the data is going to be delivered to whatever is after it in the track its situated in. In this case, the Mod's channel setting has no effect, since Live does not care at all which channel MIDI data is transmitted on internally. | By default, a Mod will transmit its output to the TrackOutput of its plugin. That means the data is going to be delivered to whatever is after it in the track its situated in. In this case, the Mod's channel setting has no effect, since Live does not care at all which channel MIDI data is transmitted on internally. | ||
| − | |||
| − | |||
If you are using OSX, it is also possible to transmit and receive via the lh_midi external created by Leigh Hunt. This object is included with the Monomodular installation, and will allow you to choose (for instance) an IAC bus as the destination for your Mods data. You can then route that IAC bus as a Track input back to your project, with much lower and more predictable amounts of latency. | If you are using OSX, it is also possible to transmit and receive via the lh_midi external created by Leigh Hunt. This object is included with the Monomodular installation, and will allow you to choose (for instance) an IAC bus as the destination for your Mods data. You can then route that IAC bus as a Track input back to your project, with much lower and more predictable amounts of latency. | ||
In addition, some Mods use MIDI for input as well. Their input source may be changed in the same way. In a situation where you would like to use another timing engine to drive the Mod, you should assign an appropriate source for that input, and define what its clock beat will be. Also, make sure to toggle off the 'Internal' button on the MIDI configuration page. | In addition, some Mods use MIDI for input as well. Their input source may be changed in the same way. In a situation where you would like to use another timing engine to drive the Mod, you should assign an appropriate source for that input, and define what its clock beat will be. Also, make sure to toggle off the 'Internal' button on the MIDI configuration page. | ||
| + | |||
| + | |||
| + | == Supported Controllers == | ||
| + | |||
| + | For more detailed descriptions of controller-specific functionality, please refer to the links below: | ||
| + | |||
| + | *[[How to use the AumPC scripts|Details for the APC]] | ||
| + | |||
| + | *[[How to use the BlockMod script|Details for the Block]] | ||
| + | |||
| + | *[[How to use the Codec script|Details for the Code]] | ||
| + | |||
| + | *[[How to use the iOs scripts|Details for the iPad]] | ||
| + | |||
| + | *[[How to use the LaunchMod script|Details for the Launchpad]] | ||
| + | |||
| + | *[[How to use the Ohm64 script|Details for the Ohm64 and Ohm64 RGB]] | ||
| + | |||
| + | *[[How to use the AumTroll script|Details for the CNTRL:R]] | ||
Latest revision as of 21:08, 5 April 2015
Mod is the hub of all communcations between Mods and their Mod capable controllers. Each client control script works in a unique way, but most of them share some standard features when it comes to manipulating the m4l patches they are designed to interact with.
Mod controllers all have the capability of controlling a Monome256 workspace. Each one does it in its specific way. The only necessity required to integrate a controller with the Mod design is that it has an 8x8 grid of buttons. Other functionality is present on some controllers, but the main features of Mod are encapsulated below.
Contents
mod Selection
Mod controller's automatically detect the currently selected device in Live's GUI. If the device is a mod and the control surface is in the appropriate mode, it will hand over its controls to the mod.
The Grid
Since each supported controller has a different layout, the grid and its assignments will vary between different mods depending on the controller that you're using to access it.
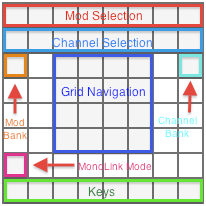
Mod provides a way to access a 256 cells (16x16) grid even even when the controller itself has a smaller workspace. Although some mods use a smaller, fixed workspace, others (specifically mods which are ported from monome applications) utilize the full grid of 256 cells and only display a portion of the workspace at any given time. It is possible to navigate the currently viewed portion of the grid on within these mods by using the modNav buttons, or pressing shift and using the grid buttons to select the currently viewed portion of the grid.
Mods that emulate monome256 workspaces use what is called "Legacy Mode", and provide some basic controls that are fairly universal between all the "Legacy Mode" mods. Some of the controls (such as modNav, modChannel, and some common modKeys) will be available in all "Legacy Mode" mods.
If you are not familiar with how a monome works, you might want to check this out:
http://en.wikipedia.org/wiki/Monome
and this:
The modShift Button
The modShift button generally does the following:
The modShift button, while pressed or locked, allows navigation to the selected viewing area of the 256Grid on mods that support a full grid. When active, the grid will light to indicate which area is currently selected (either by colors or by different flashing states).
On most controllers, while holding down modShift and pressing one buttons on the top row of the grid allows the user to select a new device in Live via the Device Selector.
For "Legacy Mode" mods, holding down modShift and pressing one of the buttons on the second row from the top of the grid allows the user to change the MIDI output channel on mods that support multi-channel MIDI transmission.
It causes the bottom row of buttons to change over to 'modKey Mode', and their status to be updated accordingly. The modKey buttons are patch specific in functionality, but there are general conventions about how they are used in most of the mods. Most of the time the left four will indicate and change the mod's 'mode', and the second four control timing of the mod if it is slaved to its internal clock.
The modAlt Button
By pressing the dedicated "modAlt" button on the controller, it is possible to access additional functionality from the "modKey" buttons as well as mod specific functionality (see the description of each mod for information on how this works for the specific implementation).
mod Timing
Most of the Mods have their own internal timing engine that is sync'ed to Live's clock. This, however, may be disengaged in order to trigger the timing process of the plugin from an external source (see below).
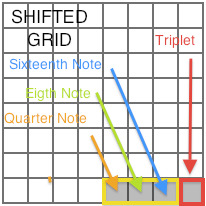
For most of the Mods, timing can be controlled by the last four Keys. The first of these changes the timing to Quarter note divisions, the second to Eighth note divisions, and the third to Sixteenth note divisions. The last button toggles Triplet timing.
In addition to the modKey controls, most Mods also have a 'Timing Multiplier', which speeds the timing engine up by the chosen amount.
Input and Output Settings
Each Mod has its own idea of how to get things in and out. For most, however, there is a fairly standard MIDI settings dialog which allows the user to change how things are routed.
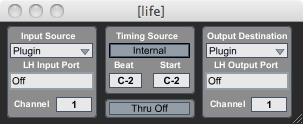
To change these settings, press the 'MIDI' button. This will bring up a floating window with that Mod's MIDI settings.
By default, a Mod will transmit its output to the TrackOutput of its plugin. That means the data is going to be delivered to whatever is after it in the track its situated in. In this case, the Mod's channel setting has no effect, since Live does not care at all which channel MIDI data is transmitted on internally.
If you are using OSX, it is also possible to transmit and receive via the lh_midi external created by Leigh Hunt. This object is included with the Monomodular installation, and will allow you to choose (for instance) an IAC bus as the destination for your Mods data. You can then route that IAC bus as a Track input back to your project, with much lower and more predictable amounts of latency.
In addition, some Mods use MIDI for input as well. Their input source may be changed in the same way. In a situation where you would like to use another timing engine to drive the Mod, you should assign an appropriate source for that input, and define what its clock beat will be. Also, make sure to toggle off the 'Internal' button on the MIDI configuration page.
Supported Controllers
For more detailed descriptions of controller-specific functionality, please refer to the links below:


