Plinko
Contents
Video Tutorials
Tutorial with Plinko and Launchpad.
Overview
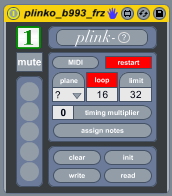
Plinko is a generative plugin built to be freely editable in realtime. See below for some attempts at explaining how it works (its, uh....well, its rather complicated).
Basically, each cell on the modGrid represents a 'node'. Each node represents the possibility of something happening. Particles are generated at the beginning of each loop cycle (if 'Loop' is turned on) from start-nodes on the grid. A start node can be created by holding down a node button and pressing the first KEY.
When a particle is generated, it will begin travelling in a certain direction on the grid. For every new node it enters, several possible outcomes could occur.
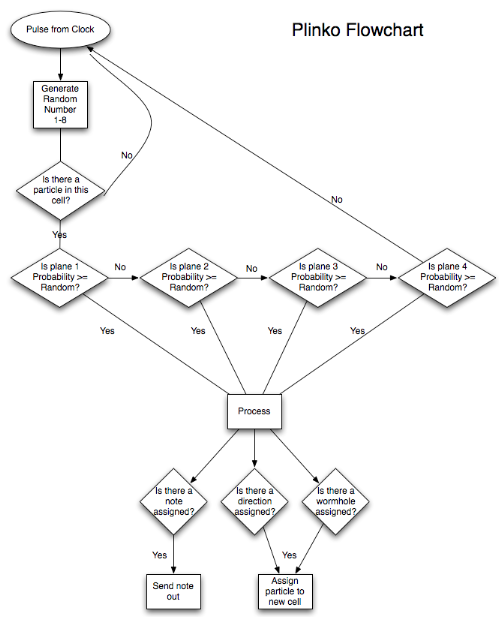
There are four planes of possibility for every node. Each plane is calculated in turn, starting with plane 1. To view the assignments for each node's plane, press one of the first four KEYs while nothing else is being held.
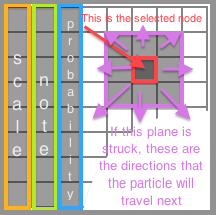
The settings for a node will be displayed on the modGrid while holding down that node's button. Depending on the orientation of the node selected, the screen may be reversed so that scale, note, and probability are on the right side of the grid instead of the left.
KEY Assignments
In addition to these basic functions, while holding down a node's button and pressing one of the KEYs, the following changes can be made:
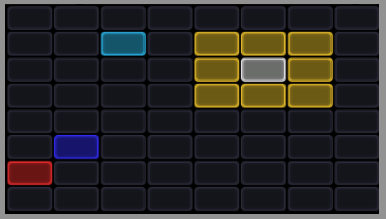
KEY 1: This will enable/disable the node as a starting node (the color of the node will change while it is being held to indicate its status).
KEY 2: This will cause the node to become a 'wormhole'. While continuing to hold down the node button after pressing KEY 2, the next cell pressed on the modGrid will become the wormhole's destination.
KEY 3: This will copy the current plane's settings to all the other planes of the node being held.
KEY 4: This will clear the current plane's settings, setting probability, scale, and note settings to 0, and removing any wormholes or directions.
It is useful when programming on multiple planes to use the node+KEY 4 combination to clear the current plane's settings, and then the node+KEY 3 combination to copy those cleared settings to all of the other planes of the current node.
Presets
While holding ALT, it is possible to store and recall preset nodal arrangements. To store a preset, hold ALT and press one of the lower 4 rows of modGrid buttons. Available slots for storage (i.e. those with no preset data stored in them) will be lit.
The user can recall one of the stored presets by holding ALT and selecting one of the top 4 rows of lit buttons.
As soon as a preset is stored by pressing one of the buttons on the bottom 4 rows, it will become lighted and available for recall on the corresponding button from the top 4 rows.
Assignments
Pressing the "assign notes" button will expose a floating window which will allow user assignments of MIDI Notes to different grid positions in the main Plinko editor screen. Each column represents one 'octave' of the assignment matrix. The assignments can be based on standard modal scales, or completely custom mappings.
Pressing the "Open Custom Assignment Editor" button will reveal the custom assignments grid. These assignments correspond to the 64 possible combinations of the two assignment buttons on the editor. Each column only applies to its corresponding column in the "assign notes" screen (so a column is only active if its corresponding column in the parent editor is assigned to "custom").
In addition, there is now a new window available, the "Script Editor" window. Please see the corresponding section for more information about this:
Original readme contained in early versions of this mod
(This is the original text document that was included with the plugin when I first released it. It is probably still somewhat helpful, and I think all these directions still apply to the current version)
Plinko/Monodal beta 0.8
The concept: Plinko is a generative grid-based sequencer. Points of potential (particles) are placed on the a, moving in a certain direction. For every new grid-square they enter, there are five user-assignable outcomes that are possible, based on the result of a random number generated each turn. Each active node may alter a particles path or fire a note when the particle passes over it. A user assignable scale may be assigned to each "octave", or a cusomized midi map may be assigned (on a per octave basis). Each octave may also be assigned to output to a generic plugin output (the monomod channel for the device), or to any specific nomeout. In this way, Plinko can feed up to eight different instruments at once.
Each square on the launchpad/grid represents a "node".
A node is either active or passive depending upon whether it has been assigned "attributes". Each node is a potential "loopstart" point. Each node has 4 "planes". Each plane has independent "direction", "note", "octave", "probability", and "wormhole" attributes.
By holding down a grid key, one can assign multiple directions to a node by pressing the keys adjacent to the pressd node. The far left or right columns, depending upon the area of the grid pressed (fi the node is on the right part of the grid, the columns will be on the left, and vice versa), represent (from left to right): octave, note, probability.
The four monomod "mode" buttons have the following effects:
When no node is pressed, they select which plane is active.
When a node is pressed:
1 - activates (or deactivates) the node as a loopstart point when in Loop mode. Generates a particle from that node travelling east (when Loop is turned off) 2- activates a wormhole. While continuing to press the node key, select a grid square as the destination for the wormhole. (e.g. press node x1y1. while holding x1y1, press mode 2. CONITINUING to hold the original node x1y1, press node x3y4). 3 - zeros a nodes attributes (only for the current plane). 4 - assigns the current planes nodal attributes to all other planes of a node.
Each "turn" represents one beat triggered by monomod. Any particles present in the grid will have their positions updated, and the node they reside in will determine an action based upon its attributes.
Each plane represents a possibility of a node firing. In its initial state, plane one has a 20% chance of happening, plane two 40%, etc. When a particle strikes a node, a random number is generated (0-8). If that number is less than plane 1's probability, then whatever attributes are also assigned to that nodes plane will be used to determine what happens. If the number is more than 1's probability, then the same comparison will be done with plane 2's probability.
For instance: a particle, traveling south, strikes a node. (for this example, we will only consider the first two planes: just as if plane 3 and 4 had their probability assigned to 0)
The node has the following attirbutes:
Plane1: oct 0 note 0 prob 4 directions: north, south. Plane2: oct 1 note 4 prob 6 directions: east, west.
The random number generated is a 7: nothing happens and the particle continues to travel south on the next turn. The random number generated is a 6: plane 2 is struck: a note is played (note4,oct0), and the particle is split in two, traveling one east and one west on the next turn. The random number generated is a 3: plane 1 is struck: no note is played (oct 0 note 0 == no note), but a new particle is created, so the old particle continues on southwards at the beginning of the next turn, joined by a new particle traveling in the opposite direction.
WTF?
Press button x1y1 (keep holding it!). Assign a direction (east). Press Mode 1 to make it a loopstart point. Press. Press x8y1 (to assign it a probability of 8: this means it will asways happen). (now let go of x1y1) Press button x5y1 (keep holding it!) Assign a direction (west). Press x8y1 (probability 8). Now let go of x5y1. Make sure loop is turn on. Start playing in Live. You should now have a particle bouncing back and forth between two red nodes.
Nodes change color when they have direction or wormhole attributes, but not when they are only assigned notes. The maximum number of particles may be limited in the GUI. Instead of generating a random number at each turn, you may assign that number in the GUI. This way you can work on one plane of probability at a time. Plane "9" in the GUI means random, this is the normal behavior. The small white button in the bottom corner will open the note editor Presets are stored via pattrstorage. They can be directly written or read from .json files.
There are lots of little things that need to be done. There will be a live-play mode very soon, where you can insert particles into the grid via MIDI in real time.


