How to use the Ohm64 script
Contents
Some Video Tutorials
Earliest tutorial with old help patcher and little commentary
Summary
The only component that is strictly necessary to get the Remote Script working in Ableton is the Script itself. It goes in the Live Application Bundle, in the "Remote Scripts" folder.
In order to use the Monomodular portion of the script, it is necessary to have Max5.18 installed, and the client plugins that are contained in the suite. I will cover the Monomodular's functionality in a seperate place.
Pete @Livid says this script melts peoples' brains. Really, its not all that complicated. I tried to fit as much functionality as I could into what was available on the controller, and I can understand why that's intimidating. But its very hard to get lost unless you insist on pressing more than one button at a time without knowing what the combination is going to do. Make this thine performance mantra: 'I shall not press two buttons at once until I understand....'
I highly recommend getting a copy of the Ohm64LCD patch; in addition to letting you know at all times what it is that you are controlling, it will also tell you precisely what the values of your parameters are (in plainspeak, not MIDIeze). Of course, you'll need m4l in order to use it.
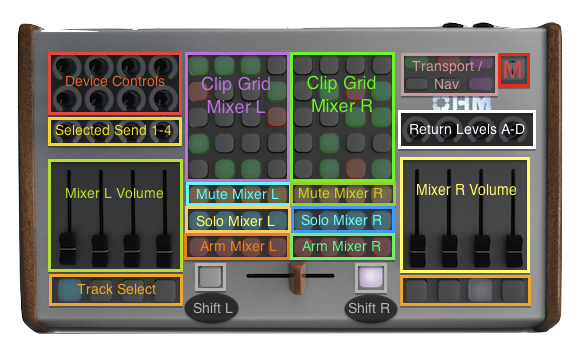
There are three independent mixers available. Two of them control four channels at a time, the third uses all 8 faders to control 8 channels.
Each mixer is independent, and remembers the last tracks that were assigned to it. When the Ohm is first connected to Live, it will automatically be in split mixer mode. If there are more than four tracks in the project, the mixer will be assigned to the first 8 tracks, otherwise both sides of the mixer will be assigned to whatever tracks are present.
Since there are several different "shift modes" available within the script, the most important concept to grasp about this scheme is that there are two shift buttons: one left, and one right. They are on either side of the crossfader. By holding down the shift button, you gain access to a bunch of different alternative functions.
The GRID
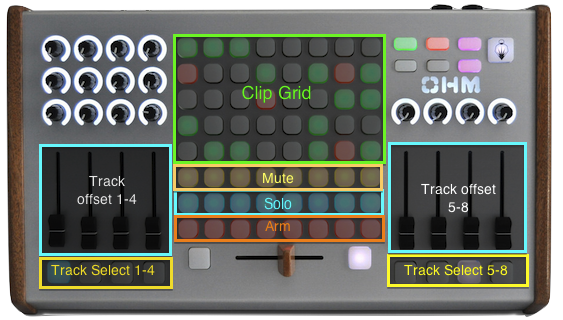
Rows 1-5: Fire Session Clips
Row 6: Mute
Row 7: Solo
Row 8: Arm
Exception: When in Right Mixer Mode 4, The right side of the Grid is mapped to DrumRacks (Pad Translation; see below**).
The SHIFTED GRID
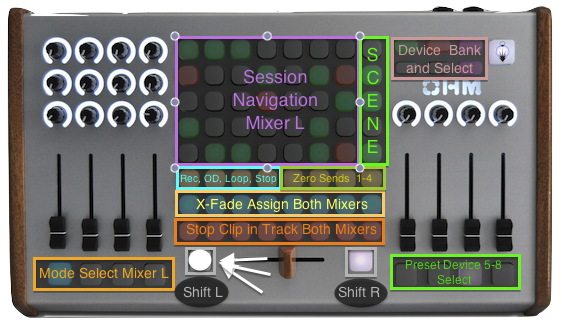
Assignments with Right Shift button pressed:
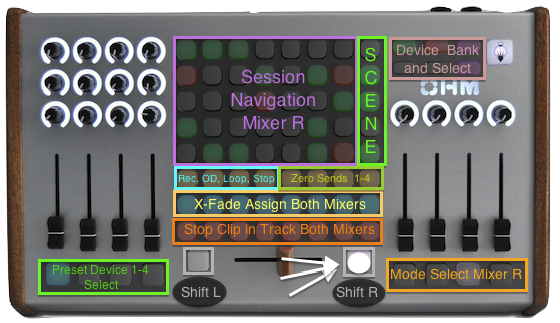
Assignments with Right Shift button pressed:
Rows 1-5(except for column 8): Session Zoom Navigation
Row 6: Record, Overdub, Loop, Stop All Clips, Zero All Sends 1-4
Row 7: Crossfader Assignment
Row 8: Stop Clip
Column 8 (Rows 1-5): Fire Scene
By holding down one of the shifts and pressing one of the channel select buttons on the same side of the controller, you can enter a different "Shift Mode".
The MODES
For the Left Mixer, Modes 1-4
Faders are always mapped to Track Volume (or MIDI Velocity...see below****).
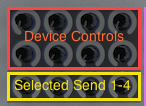 Left Mode 1: Left Dials(top 8) control selected Device, Left Dials (bottom 4) control Selected Track's Sends.
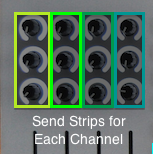 Left Mode 2: Left Dials control Sends 1-3 for the corresponding Fader's Track.
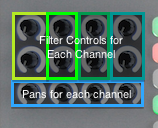 Left Mode 3: Left Dials (top 8) control Track Filter for corresponding Fader, Left Dials (bottom 4) control Pan for corresponding Fader.
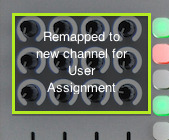 Left Mode 4: Left Dials are remapped to channel 2 so that they are User Mappable with Live.
For the Right Mixer, Modes 1-4
Right Mode 1: Faders control Track Volume, Mixer offset at Track 5, Right Dials control Returns 1-4.
Right Mode 2: Faders control Track Volume, Mixer offset at Track 9, Right Dials control Returns 1-4.
Right Mode 3: Faders control Track Volume, Mixer offset at Track 13, Right Dials control Returns 1-4.
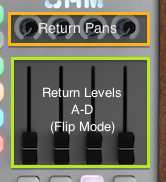
Right Mode 4: Faders control Return Volume, Right Dials control Return Pan
Buttons below the Faders select Track in all modes (except when shift is being held...see below*).
The FUNCTIONS
Function Buttons (top right) have the following functions (top left to bottom right):
Session Nav up, Play, Stop, Session Nav down, Session Nav left, Session Nav right.
Function Buttons (top right) have the following Shifted functions (top left to bottom right):
Device Bank up, Device ON/OFF, Device Lock, Device Bank down, Device Nav left, Device Nav right.
WHILE LEFT SHIFT IS PRESSED, FADER 8 CONTROLS MASTER VOLUME.
WHILE LEFT SHIFT IS PRESSED, RIGHT DIAL 4 CONTROLS PREHEAR.
MOD Mode
The Livid button switches the grid to Monomodular Mode. Most of the controls remain the same, but the grid is now used for controlling Monomodular patches.
When in Monomodular mode, the Function buttons (unShifted) control the following(top left to bottom right):
Grid Nav up, Lock (the bottom row of the grid remains 'Shifted'), Alt (access to Preset management in enabled patches...see below*****), Grid Nav down, Grid Nav right, Grid Nav left.
When in Monomodular mode, the Function buttons (Shifted) control the following(top left to bottom right).
Device Bank up, Play, Stop, Device Bank down, Device Nav left, Device Nav right.
Track selection and Mode navigation is identical in Monomodular Mode as in normal Session Mode.
By pressing either of the shift buttons, Zoom mode is invoked. In Zoom mode, the center lit square of buttons indicates the current selected quadrant. By pressing an area of that square, the grid changes assignment to the corresponding area.
In Zoom mode, the top row of buttons selects the current Monomodular plugin. The second row of buttons selects the channel that plugin transmits on (this is only useful when the plugins 'nomeout' is enabled...see below*****). The bottom row of buttons transmits 'Key' data (these buttons have special functionality specific to each Monomodular client...see the documenation with the client to find out what they do).
LINKED MIXER MODE:
By holding one shift button and pressing the other, it is possible to Link the mixer as one. In linked mode, all mode changes correspond to the descriptions of the Left Mixer, and the right dials remain locked to the Returns. It is still possible to access the Master/Prehear levels by pressing Right Shift. The linked mixer's position (i.e. track assignment) will be recalled independently from the other two mixers, thus allowing easy navigation between 16 tracks by the press of two buttons.
Footnotes
* Channel Select buttons (buttons below the Faders) operate differently depending upon which Shift button is pressed. While the left-side Shift is pressed, or when the Mixer is LINKED, the left 4 buttons select a new 'Shift Mode', while the right 4 buttons select a preset Device 5-8 (see below***). When the right-side Shift is pressed, this behavior is reversed(i.e. preset Devices 1-4 on left, Mode on right).
** Pad Translation works by reassigning the Channel/Identifier of each button. In order to use it with Drum Racks, you must enable 'Track Input' for the Ohm64's MIDI Control Input, and assign that input as the source for the DrumRack's input. By default, Pad Translation transmits on MIDI Channel 10, but you can reassign this in the MonOhm_Map.py file to your liking.
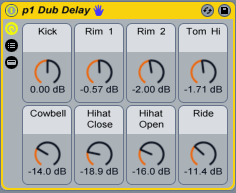
*** preset Device selection allows the user to select a predefined device instantly for editing with the Device knobs. In order for this functionality to work, the Device must be renamed so that its first two characters are p1 thru p8. Once named properly, the device may be selected by holding down a shift button and pressing one of the Channel Select buttons on the opposite side of the Ohm64 (e.g. a device named 'p1 Dub Delay' can be selected by holding down the right shift button and pressing the channel select underneath the 1st left side fader).
**** when a Velocity plugin is inserted on a MIDI Track as the first plugin, any Fader currently controlling that Track will lock to its 'Out Hi' parameter. This allows the user to control the Volume of a MIDI only track.
***** the Key buttons have specific functionality for each Monomodular client. Generally, the first four control some aspect of the plugins operation, while the second four control the timing of the plugin. However, see the individual helpfile contained in the client to find out exactly what they do for each one. The Key buttons may be 'Locked', so that they are always accessible, by pressing the 'Lock' button (the top-center Function button when in Monomodular Mode).
phewww....I think that's about it.
